NFS Shares
I have all of my media on a Synology NAS and mount it to the Plex server using NFS. So, first we need to create and mount those shares to the Plex server.
Enable NFS Sharing on Synology
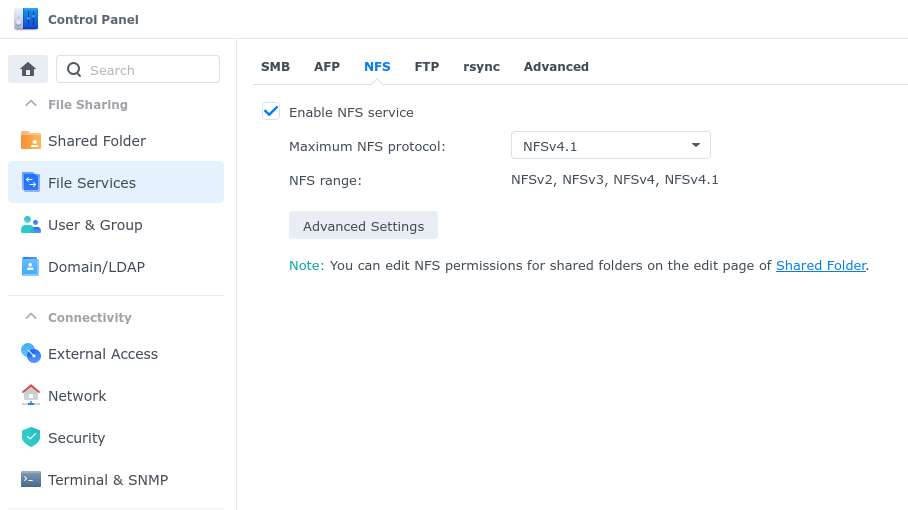
Open up the control panel in the Synology web interface and Navigate to File Services. Click on the NFS tab and check the "Enable NFS service" check box.

Create a Share for Media
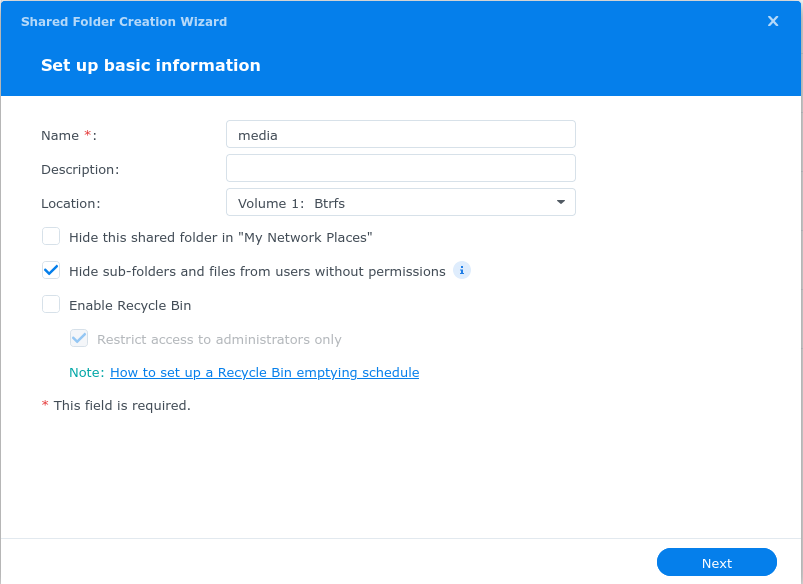
Navigate to Shared Folder in the Control Panel in the Synology web interface. Click on Create and set up a new share that will contain all of your media that Plex will have access to. Give it a name and on which volume it should be located on. I have checked the option to "Hide sub-folders and files from users without permissions" and unchecked "Enable Recycle Bin"

On the next screen, you can elect to encrypt the share if you wish. This contains no sensitive data so I do not.
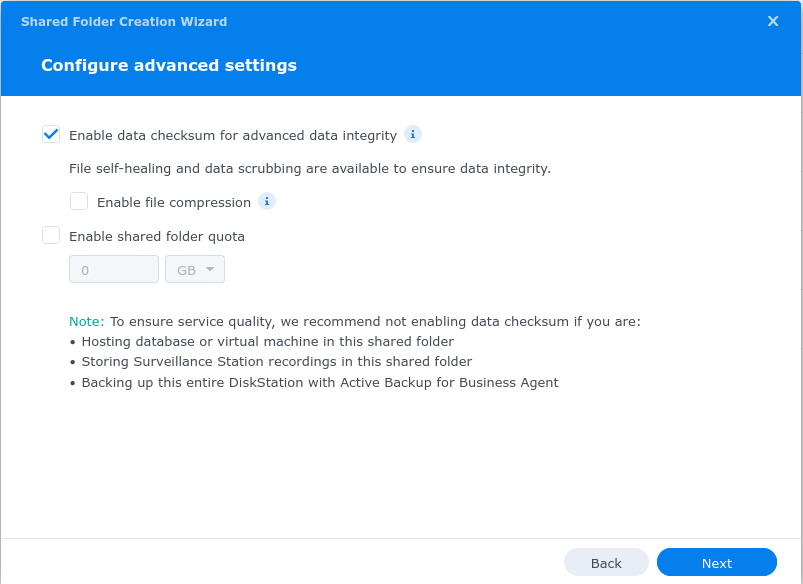
Provided that you have used BTRFS when configuring your volume, check "Enable data checksum for advanced integrity". You can enable file compression if you wish, however this will have a performance impact. This can be turned on later if desired.

Click "Next" to create the share. You will then be presented with a screen to configure user permissions. You can set this up however you like.
Once completed, your share should appear in the list. Select it and click on the "Edit" button. Click on the NFS Permissions tab and click Create.
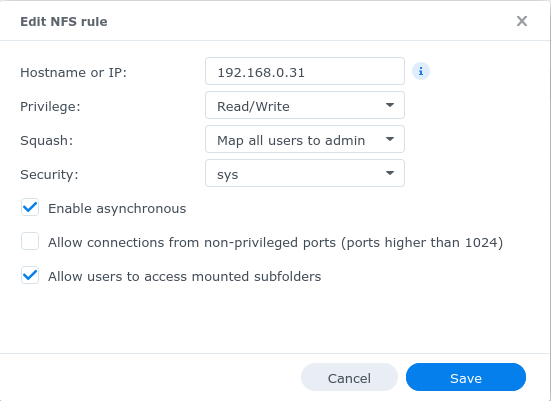
You will be prompted with a Create an NFS rule dialogue box. Enter the IP address of the server that will be running Plex. Privilege should be set to Read/Write. For squash, I selected "No mapping" as permissions will be configured inside of the mount. Security should be left at sys. I also check the "Enable asynchronous" and "Allow users to access mounted subfolders" checkboxes.

Create a Share for Torrents and Downloaded Data
Repeat everything we did for creating the media share, however I am calling this "torrents". I use snapshots on my media volume if I ever need to undo any changes that are made, and I do not want content being downloaded to be captured in the snapshots.
Mount the Shares in the Plex Server
SSH into the Plex server and create folders to mount the NFS shares to:
Install the NFS client service:
Edit the fstab file to mount the share at boot:
Add the following content at the end of the file:
#HANDYNAS MOUNTS
192.168.0.11:/volume1/media /mnt/media nfs defaults 0 0
192.168.0.11:/volume1/torrents /mnt/torrents nfs defaults 0 0
Make sure the you use the IP address for the NAS and the volume matches the volume used when creating the share.
Mount the shares:
Now if you create a file or directory in the share you should see it reflected on both the server and the Synology:
Lastly, we should set ownership and permissions for the folders so that it can be written to by all of services that will be supporting Plex. I run everything using the user created at installation, however you may want to run it as a different user. In that case, you will need to create a new user and take note of the UID and GID of that user.
Next, set the owner of the folders the be appropriate user and group. The permissions are set so that the owner is 'handyadmin' and members of the group 'handyadmin' have read/write/execute permission and all other users have read/execute only access.
sudo chown -R handyadmin:handyadmin /mnt/media
sudo chown -R handyadmin:handyadmin /mnt/torrents
sudo chmod -R 775 /mnt/media
sudo chmod -R 775 /mnt/torrents
Make Subdirectories
Now let's create folders to store our specific media types. I have set up folders for movies, tvshows, and music.
Since I have changed the permissions for the media folder and I am logged in as the owner, I can simply run:
You can ensure the directories exist and have the correct permissions: